Join Discord
ACTION RPG

Soulmask: Complete Strategy Guide

Master the knowledge and technology, combat techniques, and dungeon strategies in this challenging action RPG.

35 min read
Updated Sep 2025
By Jade Vanity Gaming

Introduction to Soulmask

Soulmask is a challenging action RPG that combines fast-paced combat with deep character customization through its unique mask system. Set in the dark fantasy world of Etheria, players take on the role of a Soulkeeper, a warrior with the ability to harness the power of ancient masks that grant unique abilities.

Game Overview

  • Genre: Action RPG
  • Difficulty: High
  • Main Mechanics: Mask Technology, Knowledge System, Stamina Management
  • Playtime: 40-60 hours

This guide will walk you through everything you need to know to master Soulmask, from basic controls and early-game strategies to advanced techniques and hidden secrets. Whether you're struggling with a particular boss or looking to optimize your build, we've got you covered.

Soulmask Game Characters

Soulmask features a diverse cast of characters in a dramatic fantasy setting.

Getting Started

Character Creation

When creating your character in Soulmask, you'll need to choose from one of three Masks :

Mask Playstyle Focus Perks
Civilization Mask Tanking and absorbing damage. Durability and support. Enhanced resistance to damage, allowing you to withstand hits and protect others.
Conquest Mask Stealth, precision, and high-risk combat. Melee combat and rogue-like tactics. Improves stealth abilities, boosts damage from behind, and often includes a lifesteal effect.
Rich Mask Ranged combat, hunting, and archery. Precision, ranged damage, and resource gathering. Boosts arrow precision, increases damage against creatures, and helps reduce stamina costs for actions.

Beginner's Tip

For new players, we recommend starting with the Civilization Mask. It focuses on durability and support, making early combat more forgiving with its enhanced damage resistance. The Conquest Mask offers high damage potential with its stealth and precision focus, but requires more careful timing and positioning to be effective.

Basic Controls

Mastering the controls is essential for success in Soulmask:

WASD
Movement
Left Click
Light Attack
Right Click
Heavy Attack / Block (when holding)
Space
Dodge / Roll
Shift
Sprint
E
Interact
Q
Use Healing Item
Tab
Switch Active Mask
1-4
Mask Abilities
T
Knowledge & Technology Menu

Knowledge and Technology

The Knowledge and Technology system is a core progression mechanic in Soulmask that allows you to unlock crafting blueprints and advance your capabilities. Understanding this system is essential for success in the game.

Accessing the Technology Tree

Press T to open the Knowledge and Technology menu. Here you can unlock crafting blueprints and recipes using Technology Points earned by reading Ancient Tablets found throughout the World Map.

Knowledge and Technology Menu

The Knowledge and Technology menu showing various technology tiers and unlockable blueprints.

Technology Tiers

The technology system in Soulmask is divided into six progressive tiers, each associated with a specific type of Bonfire that serves as both a crafting station and a technology hub:

Technology Tier Bonfire Type Era Name Primary Focus
Tier 0 Campfire "The Rise of the Barbarians" Wood, Stone, and Thatch materials; basic crafting
Tier 1 Bonfire Dawn of the New Tribe Advanced primitive tools and structures
Tier 2 Bronze Pit Bonfire Advancement of Bronze Bronze weapons, tools, and armor
Tier 3 Iron Pit Bonfire Glow of Iron Iron-based equipment and advanced structures
Tier 4 Steel Pit Bonfire Steel Age Steel weapons and advanced combat gear
Tier 5 Fine Steel Pit Bonfire Deep in Ruins End-game equipment and mask enhancements

Getting Started with Technology

Tier 0 is the foundation of your technological journey in Soulmask. This tier becomes available as soon as you build your first Campfire, representing the very first stage of civilized technology.

Early Game Tip

Many nodes in Tier 0 can be unlocked even before you collect any Knowledge Points. Focus on building your first Campfire early to access these basic technologies, which primarily revolve around Wood, Stone, and Thatch materials, as well as fundamental crafting recipes.

Technology Progression

To advance through the technology tiers, you'll need to:

  1. Collect Ancient Tablets from exploration and defeating enemies
  2. Read the tablets to earn Technology Points
  3. Spend these points to unlock nodes in the Knowledge and Technology tree
  4. Build the appropriate tier Bonfire to access higher-level crafting
  5. Gather the necessary materials to craft items from your unlocked blueprints

Important Note

Technology progression is essential for accessing dungeons in Soulmask. You must reach awareness level 40 or above to enter dungeons, which requires significant advancement through the technology tree. Plan your Technology Point spending carefully to optimize your progression path.

Key Technology Nodes

While exploring the extensive technology tree, prioritize these crucial nodes for efficient progression:

Basic Tools (Tier 0)

Unlocks the ability to craft stone tools, essential for gathering resources more efficiently.

Basic Shelter (Tier 0)

Enables construction of simple shelters to protect against environmental hazards.

Advanced Bonfire (Tier 1)

Unlocks the standard Bonfire, opening access to Tier 1 technologies and more advanced crafting options.

Bronze Working (Tier 2)

Enables crafting of bronze weapons and armor, significantly improving combat capabilities.

Masks and Stats

Discover the unique masks in Soulmask, each with its distinct appearance, attributes, and playstyle. Browse through our comprehensive guide below:

Mask Name Description Solar Standby Crystal Deter Energy
Civilization
Civilization Mask
Two round eye holes reveal hints of dignity and majesty. The slightly agape mouth seems to be chanting something sacred. 2 1 1 2 1
Conquest
Conquest Mask
The surface of the mask reveals narrow, abyssal eye sockets, seemingly peering into all the sins of the virtual world. The menacing fangs instill a sense of dread upon gazing. 2 1 1 2 1
Rich
Rich Mask
The mask is adorned with twinkling star patterns, shimmering brightly in the dark night. The two pairs of eyes form harmonious and mysterious arcs, as if they are about to encompass everything beautiful in the world. 2 1 1 2 1
Torch of Eternity
Torch of Eternity Mask
The fan-shaped headwear is imbued with a strong sense of ritual. The mysterious gem seems to travel through time and space, witnessing the rise and fall of a mysterious ancient tribe. 3 2 3 2 2
Wilderness Mark
Wilderness Mark Mask
The hidden jawline brings out the untamed spirit within, hinting at repressed emotions and fiery passion. It's the essence of freedom. 4 4 3 2 3
Tactical Guidance
Tactical Guidance Mask
The mouth and nose seem to be sealed to fulfill a certain important oath and pact. The sharp eyes naturally made people stand in quiet reverence. 4 2 3 2 4
Ironblood Guard
Ironblood Guard Mask
It has a beak like a menacing sharp spear and a pair of deep eyes that intimidate enemies by looking at them with contempt. 2 2 4 3 2
Shadow Walker
Shadow Walker Mask
In the vacant eye sockets, a profound glimmer shimmers, as if concealing an unfathomable abyss of darkness. A sinister and eerie aura permeates the air. 2 3 2 3 5
Nature Enlightenment
Nature Enlightenment Mask
Eyes resembling morning dews that display reverence and passion for nature. The slender ears are always listening to the sound everything makes. 4 4 3 2 3
Explorer
Explorer Mask
The optical device shines with wisdom and reflects inner determination. The pattern is inscrutable yet smooth, exuding both coolness and power. 4 5 4 4 4

Awareness Level Requirement: Reach level 40 or above to access dungeons in Soulmask, ensuring you've developed sufficient skills for the most challenging content.

Understanding Mask Stats

Each mask in Soulmask has five key attributes that determine its performance and capabilities:

  • Solar Conversion Efficiency: Determines how quickly the mask stores energy when exposed to sunlight. Higher values mean faster energy accumulation.
  • Standby Energy Consumption: Indicates how efficiently the mask operates at low power. Lower values mean the mask can function longer on minimal energy.
  • Red Crystal Slot Limit: Determines how many and how powerful red crystal attachments can be used with the mask. Higher values allow for more powerful customization.
  • Deterrence Strength: Affects how effectively the mask can deter targets. Higher values make it easier to intimidate or control enemies.
  • Base Energy Node Capacity: The fundamental power reserve of the mask before additional energy nodes are repaired. Higher values provide more operational capacity.

Important Note on Mask Selection

Your choice of mask significantly impacts your gameplay experience in Soulmask. Each mask offers distinct advantages:

  • Civilization/Conquest/Rich: Balanced starter masks with moderate energy efficiency. Good for beginners learning the game mechanics.
  • Torch of Eternity: Enhanced crystal slots make this ideal for players who rely on attachments and modifications.
  • Wilderness Mark/Nature Enlightenment: Superior solar conversion efficiency makes these excellent for extended exploration in outdoor environments.
  • Tactical Guidance: High energy node capacity allows for prolonged use of energy-intensive abilities.
  • Ironblood Guard: Enhanced crystal slots and deterrence strength make this perfect for combat-focused playstyles.
  • Shadow Walker: Exceptional base energy capacity with good deterrence, ideal for stealth approaches and night operations.
  • Explorer: The most balanced high-tier mask with excellent stats across all categories, perfect for versatile playstyles.

Remember: To access dungeons, you must reach awareness level 40 or above. Choose a mask that complements your preferred playstyle and the challenges you expect to face.

Combat Techniques

Combat in Soulmask is challenging and requires mastery of several key mechanics. Understanding these systems will help you survive the game's difficult encounters.

Basic Combat Flow

The combat in Soulmask follows a rhythm of attacks, dodges, and ability usage:

  • Light Attacks: Quick, low-stamina attacks that can be chained
  • Heavy Attacks: Slower but more powerful attacks that consume more stamina
  • Dodging: Essential for avoiding damage, provides brief invulnerability frames
  • Blocking: Reduces incoming damage but drains stamina while active
  • Mask Abilities: Powerful skills that consume mask energy

Combat Tip

Don't get greedy with attacks. Most enemies have clear attack patterns - learn to recognize their wind-up animations and dodge accordingly. After dodging, you'll often have a brief window to counter-attack safely.

Stamina Management

Stamina is a critical resource in combat. Every attack, dodge, and block consumes stamina, which regenerates over time. Running out of stamina leaves you vulnerable to enemy attacks.

Tips for effective stamina management:

  • Never deplete your stamina bar completely
  • Pause between attack combos to allow stamina to regenerate
  • Blocking consumes stamina continuously - use it sparingly
  • Some masks and equipment can improve stamina regeneration

Character Builds

Creating an effective build in Soulmask involves carefully allocating attribute points and selecting complementary masks and equipment.

Recommended Builds

Berserker Build

Primary Stats: STR (25+), VIT (15+)

Secondary Stats: DEX (10), SPR (8)

Recommended Masks: Ironblood Guard, Tactical Guidance

Weapons: Two-handed weapons (Great Axe, Warhammer)

This build focuses on dealing massive damage with heavy weapons. The high Strength stat maximizes damage output, while Vitality ensures you can take a few hits. This build excels at staggering enemies and breaking their guard but requires careful positioning due to slower attack animations.

Shadow Assassin Build

Primary Stats: DEX (25+), SPR (15+)

Secondary Stats: STR (8), VIT (10)

Recommended Masks: Shadow Walker, Wilderness Mark

Weapons: Dual daggers, Short sword and dagger

The Shadow Assassin excels at dealing critical damage and applying status effects. High Dexterity ensures your attacks land and increases critical hit chance, while Spirit allows for frequent use of mask abilities. This build requires good timing and positioning but can deal devastating damage when executed correctly.

Soul Mage Build

Primary Stats: SPR (25+), VIT (12+)

Secondary Stats: DEX (10), STR (6)

Recommended Masks: Torch of Eternity, Nature Enlightenment

Weapons: Staff, Wand and Orb

The Soul Mage focuses on ranged combat and powerful mask abilities. High Spirit maximizes mask energy and ability damage, while moderate Vitality provides some survivability. This build excels at area-of-effect damage and crowd control but requires careful positioning to avoid being overwhelmed in close combat.

Ancient Dungeons

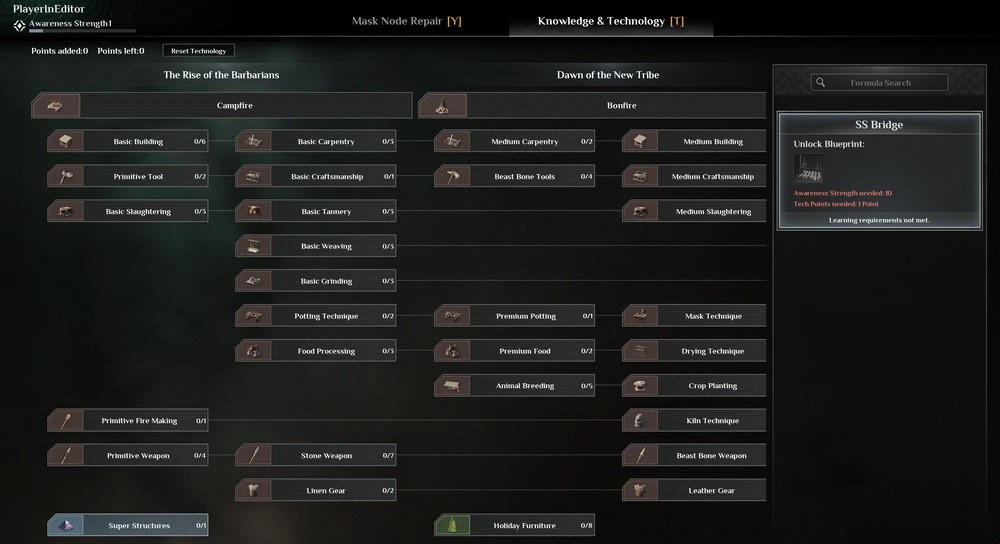
Ancient Dungeons (not to be confused with Ancient Ruins Dungeons) are instanced, procedurally-generated dungeons that can be accessed via special portals using a variety of crystals and keys. These challenging environments are essential for acquiring rare materials and equipment.

Why Farm Ancient Dungeons?

Farming Dungeons is the only way to acquire certain items and materials:

  • Nature Enlightenment (Broken), required to craft the Nature Enlightenment Mask
  • Ironblood Guard (Broken), required to craft the Ironblood Guard Mask
  • Rare materials needed for broken Mask repairs, such as Astrabon, Photon Cluster, Ni-Crystalline, Nanofiber, and Moss Polymer
  • Ancient, Archaic, and Mysterious Equipment (unique armor and weapon sets)

Specific Mask and equipment drops are not guaranteed, so a dungeon may need to be repeated many times to get the right armor or components.

Portal Access

There are three dungeon portal locations, each increasing in difficulty. They are represented on the World Map with a swirl portal icon:

Location Difficulty Requirements Timer
Plateau Woodland Small Dungeon - Level 40
  • 3 Green Crystals
  • 1 Yellow Crystal
  • 300 Mask Energy (40 Awareness Strength)
45 minutes
Barren Meadow Medium Dungeon - Level 50
  • 4 Green Crystals
  • 1 Dungeon Key
  • 2 Yellow Crystals
  • 600 Mask Energy
1 hour
Alpine Land Big Dungeon - Level 60
  • 5 Green Crystals
  • 1 Dungeon Key
  • 3 Yellow Crystals
  • 1 Purple Crystal
  • 1,600 Mask Energy
1.5 hours

Group Exploration

A portal can be entered with a party, but players need to be close together to be teleported to the same instance. Coordinate with your team before activating the portal.

Obstacles

Timers

As soon as the player activates the portal, a countdown will begin. The timer shows at the top of the screen for the duration of the time they are in the dungeon.

  • Small dungeons have a 45-minute timer
  • Medium dungeons have a 1-hour timer
  • Big dungeons have a 1.5-hour timer

A dungeon can be completed before the timer ends, but if the player is still in the dungeon when time runs out, they will be teleported back to the overworld portal.

Enemies

Ancient Dungeons are typically guarded at the entrance by Plunderers. Inside, they are solely populated by Archaic Guardians - robotic Mechanical Core and Slayer type enemies in almost every room.

There are two primary boss fights in each dungeon:

  1. A Mechanical Core II or Slayer S with two smaller Mechanical Cores or Slayers on either side. They guard the Prismatic Key needed to reach the second boss.
  2. One Terminator Slayer guarding the final room containing a Divine Tablet, an Ancient Hero's Coffin and a Golden Relic Chest with loot, and a return portal.

Traps

The most common traps in Ancient Dungeons are:

  • Floor spike plates which trigger when stepped on
  • Arrow traps triggered by a single black plate on the floor
  • Giant axes swinging from the ceiling
  • Flamethrower turrets

Trap Warning

The axes and flamethrowers activate at precise intervals, so they are easy to get past with the right timing. The floor plate traps are trickier, especially at the top of stairs or when approaching a chest in one of the shape-key rooms.

Dungeon Keys/Mechanisms

Metal Relic Chests containing Ancient, Archaic, or Mysterious equipment are found behind special doors (called "Mechanisms") that have gold or silver shapes on them. These are locked until a matching key can be found. The keys are easy to spot (large glowing and rotating shapes floating on pedestals), but they are scattered throughout the dungeon - sometimes quite far from the door they open.

There are several types of keys, usually named after shapes. Not all of them will show up in any given instance, with the exception of the Ultimate Key which is required to access the Terminator boss room:

  • Triangular Key
  • Cruciform Key
  • Rhomboid Key
  • Prismatic Key
  • Ultimate Key

Each key takes up an inventory slot and is not consumed when used, so their matching rooms can be visited repeatedly. However they are all removed from the inventory when using the portal to return to the overworld.

Tips for Dungeon Navigation

Unlike Holy Ruins or Ancient Ruins Dungeons, the fire braziers in Ancient Dungeons are interactable, and can be used to mark rooms you have been in by turning them on or off.

Navigation Tips

  • Due to some braziers not maintaining their set on/off states, it is highly recommended to also bring a stack of Quaking Stars with you to mark your trail.
  • The twists and turns in some dungeons can be extremely confusing and repetitive, especially when farming them repeatedly (certain room layouts show up a lot, but in different combinations/connected differently). Leaving yourself a breadcrumb trail is incredibly helpful.
  • If you have searched everywhere but all rooms have been visited, look for a narrow floor-to-ceiling wall in one of them that has a repeated upside down chevron (V) pattern on it. There is usually a ladder behind that type of wall to access the next floor.

Dungeon Loot Table

Each dungeon area contains specific enemies and loot. Understanding what drops where will help you farm efficiently for the items you need:

Map Area Enemy Level Enemy NPC Loot Chest Loot
Plateau Woodland 36-40 Plunderer Bronze Equipment, Coal Ore, Silica Sand Ancient Equipment, Nature Enlightenment (Broken), Red Crystal Modules, Yellow Crystal, Green Crystal, Sunstone, Gold Ingot, Salt Mine, Wines, Potions, Metal Chunk
40 Plunderer Elite Legendary/Epic Bronze Equipment, Legendary/Epic Bronze Weapon, Incendiary Device, Gold Trinket, Cactus Essence, Coagulation Cream, Food, Wines, Semi-finished product
40 Terminator Mysterious Metal Chunk, Metal Part, Metal Plate, Sunstone, Green Crystal, Epic Red Crystal
40 Mechanical Core II / Slayer S Metal Chunk, Metal Part, Metal Plate, Sunstone, Green Crystal, Fine/Excellent Red Crystal
40 Slayer Metal Material, Green Crystal, Sunstone, Energy Module
Barren Meadow 46-50 Plunderer Iron Equipment, Iron Ore, Niter Powder, Potions, Corrosion Tank Archaic Equipment, Restrictive Module (Nature Enlightenment), Red Crystal Modules, Yellow Crystal, Green Crystal, Sunstone, Gold Ingot, Meteorite Ore, Wines, Potions, Metal Chunk
50 Plunderer Elite Legendary/Epic Iron Equipment, Legendary/Epic Iron Weapon, Incendiary Device, Gold Trinket, Hematogenesis Cream, Blood Essence, Advanced Food, Wines, Semi-finished product
50 Terminator Mysterious Metal Chunk, Metal Part, Precision Part, Sunstone, Green Crystal, Epic Red Crystal, Mysterious Alloy
50 Mechanical Core II / Slayer S Mysterious Metal Chunk, Metal Part, Precision Part, Sunstone, Green Crystal, Epic Red Crystal, Mysterious Alloy
50 Slayer Metal Material, Green Crystal, Sunstone, Energy Module
Alpine Land 56-60 Plunderer Steel Equipment, Gold Obsidian, Crystal, Potions, Attack Mod 2 Mysterious Equipment, Restrictive Module (Ironblood Guard), Red Crystal Modules, Yellow Crystal, Green Crystal, Sunstone, Gold Ingot, Gold Obsidian, Crystal, Mysterious Alloy, Wines, Potions, Metal Chunk
60 Plunderer Elite / Mountain King - Heart Devourer Legendary/Epic Steel Equipment, Legendary/Epic Steel Weapon, Incendiary Device, Gold Trinket, Hematogenesis Cream, Blood Essence, Advanced Food, Wines, Semi-finished product
60 Terminator Mysterious Metal Chunk, Metal Part, Precision Part, Sunstone, Green Crystal, Legendary Red Crystal, Mysterious Alloy
60 Mechanical Core II / Slayer S Mysterious Metal Chunk, Metal Part, Precision Part, Sunstone, Green Crystal, Legendary Red Crystal, Mysterious Alloy
60 Slayer Metal Material, Green Crystal, Sunstone, Energy Module

Important Note

Remember that specific mask components like Nature Enlightenment (Broken) and Ironblood Guard (Broken) are not guaranteed drops. You may need to run dungeons multiple times to acquire these rare items. The Plateau Woodland dungeon drops Nature Enlightenment components, while Alpine Land drops Ironblood Guard components.

Temple Guardians

Soulmask features powerful Temple Guardians that can be summoned at their respective Pyramids. These challenging encounters require specific strategies and careful preparation, but offer valuable rewards upon defeat.

Summoning Temple Guardians

Temple Guardians can be summoned at their respective Pyramids by crafting either of their gems. Each guardian requires specific materials to summon, which can be found in the regions surrounding their pyramid.

Guardian Image Location Level Summon Material Rewards
Saber-toothed Predator Saber-toothed Predator Southwest Pyramid (Northern Rainforest) 20 Premium Fossil Metal Saber-toothed Predator Key, Data Update 1
Fog-Frog Fog-Frog Pyramid (Western Wetland) 30 Royal Earth Ore Fog-Frog Key, Data Update 2
Vajra Ape Vajra Ape Western Pyramid (Risen Mountain) 40 Worship Container Vajra Ape Key, Data Update 3
Tempest Griffin Tempest Griffin Northern Wasteland 50 Tempest Essence Tempest Griffin Key, Data Update 4
Mammoth Mammoth Snow Mountain Pyramid (Alpha Land) 60 Ancient Tusk Fragment Mammoth Key, Data Update 5

Guardian Rewards

Defeating Temple Guardians is essential for progressing through the game's Data Update system. Each guardian drops a unique key that allows you to enter their pyramid and perform a large-scale data update, unlocking new mask features and abilities.

Saber-toothed Predator

Difficulty: ★★★☆☆
Saber-toothed Predator

Location: Southwest Pyramid (Northern Rainforest)

Recommended Level: 25+

Weakness: Fire damage, Stun abilities

Resistance: Physical damage, Poison effects

Strategy:

The Saber-toothed Predator is the first Temple Guardian you'll likely encounter. It attacks with powerful lunges and claw swipes. The fight has two distinct phases:

Phase 1: The Predator will primarily use melee attacks with its claws and teeth. Dodge to the side when it crouches low (signaling a pounce attack), then counter with 2-3 strikes. When it roars, prepare to dodge the charging attack that follows.

Phase 2: At 50% health, the Predator will become enraged, gaining increased attack speed and new attack patterns. It will begin to use a spinning tail swipe that can hit in a 360-degree arc. Focus on dodging behind obstacles when it prepares this attack, then counter during its recovery animation.

Guardian Tip

The arena contains several rock formations that can be used to block the Predator's charge attacks. Position yourself near these when the boss is preparing a charge to force it to crash, creating a longer opening for counterattacks.

Fog-Frog

Difficulty: ★★★★☆
Fog-Frog

Location: Pyramid (Western Wetland)

Recommended Level: 35+

Weakness: Lightning damage, Freeze effects

Resistance: Water damage, Knockback effects

Strategy:

Fog-Frog is a nimble Temple Guardian that uses water-based attacks and high mobility to overwhelm players. Understanding its movement patterns is key to victory.

Phase 1: Fog-Frog will hop around the arena, occasionally stopping to spit water projectiles that cause slow effects if they hit. Focus on maintaining medium distance and attacking after it completes a jump sequence (usually 3-4 hops).

Phase 2: At 70% health, Fog-Frog will dive into the water that begins to fill the arena floor. Watch for ripples in the water to track its movement, and dodge when the ripples rush toward you. It will periodically emerge to attack, creating brief windows for counterattacks.

Phase 3: Below 30% health, Fog-Frog will summon smaller frog minions that can inflict poison damage. Prioritize eliminating these minions while continuing to dodge Fog-Frog's increasingly rapid attacks.

Vajra Ape

Difficulty: ★★★★★
Vajra Ape

Location: Western Pyramid (Risen Mountain)

Recommended Level: 45+

Weakness: Ice damage, Stagger effects

Resistance: Physical damage, Fire damage

Strategy:

The Vajra Ape is a powerful Temple Guardian with tremendous strength and surprising agility. Its attacks can deal massive damage and often cover wide areas, making positioning crucial.

Phase 1: The Ape will use powerful but slow melee attacks, including ground pounds that create shockwaves and sweeping arm strikes. Dodge through these attacks rather than away from them, as they have significant range.

Phase 2: At 60% health, the Vajra Ape will climb the pillars around the arena and begin throwing large rocks. Use the cover of fallen debris to avoid these projectiles. When it returns to the ground, it becomes vulnerable for a few seconds.

Phase 3: Below 30% health, the Ape enters a berserk state, glowing with energy and gaining new combo attacks. It will chain up to five attacks in sequence with minimal recovery time. Focus on perfect dodges during this phase to create counterattack opportunities.

Critical Warning

When the Vajra Ape pounds its chest and roars, it's preparing for a massive area-of-effect attack that can one-shot players below 1000 HP. Either get behind a pillar or use the Tactical Guidance mask's defensive ability to survive this attack.

Tempest Griffin

Difficulty: ★★★★★
Tempest Griffin

Location: Northern Wasteland

Recommended Level: 55+

Weakness: Earth damage, Grounding effects

Resistance: Wind damage, Ranged attacks

Strategy:

The Tempest Griffin is a formidable aerial Temple Guardian that controls wind and lightning. The fight takes place in an open arena with few places to take cover, making mobility essential.

Phase 1: The Griffin will primarily attack from the air, diving at players and creating wind gusts that can push you off the arena edges. Use the Explorer or Shadow Walker masks for their enhanced mobility to counter these effects.

Phase 2: At 65% health, the Griffin will summon storm clouds that periodically strike the arena with lightning. These strikes are telegraphed by glowing circles on the ground. The Griffin will also begin using wind vortex attacks that pull players toward it before striking with its talons.

Phase 3: Below 35% health, the Tempest Griffin enters its final phase, creating a massive storm that limits visibility and constantly damages players with wind and lightning. Use ranged attacks when possible and focus on dodging its increasingly rapid dive attacks.

Mammoth

Difficulty: ★★★★★★
Mammoth

Location: Snow Mountain Pyramid (Alpha Land)

Recommended Level: 65+

Weakness: Fire damage, Mobility reduction

Resistance: Ice damage, Knockback effects

Strategy:

The Mammoth is the most challenging Temple Guardian, combining massive health, devastating attacks, and environmental hazards. This fight requires perfect execution and high-level gear.

Phase 1: The Mammoth will charge across the arena and use its tusks for sweeping attacks. The ground will periodically freeze, reducing player movement speed. Break the ice crystals that appear to create safe zones where you can move normally.

Phase 2: At 70% health, the Mammoth will rear up and slam the ground, creating ice spikes that erupt across the arena in patterns. Learn these patterns to find safe spots. It will also begin using its trunk to grab players and throw them, which can be countered by using a mask ability at the right moment.

Phase 3: Below 40% health, the Mammoth summons a blizzard that reduces visibility and gradually drains player health. It will also create ice clones of itself that deal less damage but can still stun players. Focus on destroying these clones quickly while continuing to damage the real Mammoth, which can be identified by its glowing eyes.

Advanced Strategy

The Wilderness Mark mask is particularly effective against the Mammoth due to its high solar conversion efficiency, which counters the energy drain effect of the blizzard. Combine this with fire-based weapons for maximum effectiveness.

Data Updates and Progression

Each Temple Guardian drops a key that allows access to their pyramid's inner chamber. Inside, you can perform a Data Update that unlocks new mask features:

Data Update Guardian Unlocked Feature Requirements
Data Update 1 Saber-toothed Predator Mask info entry function, Mysterious Stone Tables and remodel devices 52 Sunstone (Enough energy), Saber-Toothed Predator Key
Data Update 2 Fog-Frog Mimicry mode of masks (tap C to activate) 52 Sunstone (Enough energy), Fog-Frog Key
Data Update 3 Vajra Ape Mask teleport module and portal parts 102 Sunstone (Enough energy), Vajra Ape Key
Data Update 4 Tempest Griffin Body Enhance Module; Level cap +5 103 Sunstone (Enough energy), Tempest Griffin Key
Data Update 5 Mammoth Body Enhance Module; Level cap +5 154 Sunstone (Enough energy), Mammoth Key

Advanced Tips

Once you've mastered the basics of Soulmask, these advanced techniques will help you maximize your effectiveness and discover everything the game has to offer.

Combat Techniques

Perfect Dodge

Dodging at the exact moment an attack would hit (when the enemy weapon flashes) triggers a Perfect Dodge, slowing time briefly and allowing for a powerful counter-attack. This technique is essential for high-level play.

Guard Breaking

Against shielded enemies, use a heavy attack followed immediately by a mask ability to break their guard. This creates a brief stagger effect during which enemies take 50% more damage.

Mask Switching Combos

Switching masks mid-combo (using Tab between attacks) resets your attack animation, allowing for extended combos. Additionally, some mask combinations create special effects when switched in sequence.

Energy Conservation

When exploring, switch to masks with high Solar Conversion Efficiency during daylight hours, then switch to masks with low Standby Energy Consumption during night exploration to maximize your energy reserves.

Advanced Mask Customization

Master technologists can create specialized mask enhancements with unique properties:

Red Crystal Fusion

At Technology Tier 4, you unlock the ability to fuse red crystals together. This destroys both crystals but creates a new one that combines abilities from both. The success rate depends on your Technology level and the compatibility of the crystals being fused.

Optimal fusion combinations:

  • Solar Crystal + Energy Crystal = Perpetual Crystal (self-sustaining energy generation)
  • Stealth Crystal + Combat Crystal = Assassin's Crystal (critical hit bonus after stealth attacks)
  • Perception Crystal + Deterrence Crystal = Warden's Crystal (automatically deters enemies when they're detected)

Speedrunning Tips

For players looking to complete the game quickly or farm resources efficiently:

  • The Explorer mask's enhanced perception can reveal hidden shortcuts in dungeons
  • Soul Resonance Points can be activated through walls with the Echo Locator item
  • Boss fights can be significantly shortened by using elemental weaknesses and interrupting key animations
  • The hidden Chronomancer's Mask (found in the Timeless Void secret area) allows you to slow time for 10 seconds, making difficult platforming sections trivial

Final Tip

Remember that Soulmask is designed to be challenging. Don't be discouraged by difficult encounters—each death is an opportunity to learn and improve. Experiment with different mask combinations, adapt your strategy to each situation, and most importantly, enjoy the journey of mastering this complex and rewarding game.

Explore More Game Guides

Looking for guides to other games? Check out our complete collection of in-depth gaming guides.

All Game Guides